Since Embarcadero introduced touch screen support, the way gestures are being handled has evolved. Now that we are in the RAD Studio XE8 days, it has become pretty straightforward as documented in their “Gesturing Overview” article.
That article lays out the foundation on how to work with touch gestures and controls. Applying that to TeeChart, means we’ll need TChart and TGestureManager components. TGestureManager, which manages all the gestures that can be used by the control, will have to be associated to TChart’s Touch property. There you can choose which gestures will be associated with the control. There are three kinds of gestures: standard, custom and interactive. The example discussed is based on Delphi’s interactive gestures example.
Here you can download the full project used for the article. Now I’ll explain how to create it. Before starting to write code, please do the following at design-time: add a TChart component, add a TGestureManger component, passing the gesture manager to TChart‘s Touch property and enable Zoom, Pan and DoubleTap interactive gestures on it.
Once this is done, it’s time to start typing code. First of all we’ll deactivate some TeeChart standard interactions so they don’t interfere with the functionality gestures will implement. So we will disable default zoom and panning in form’s OnCreate event:
procedure TForm1.FormCreate(Sender: TObject);
var
Series1: TSurfaceSeries;
begin
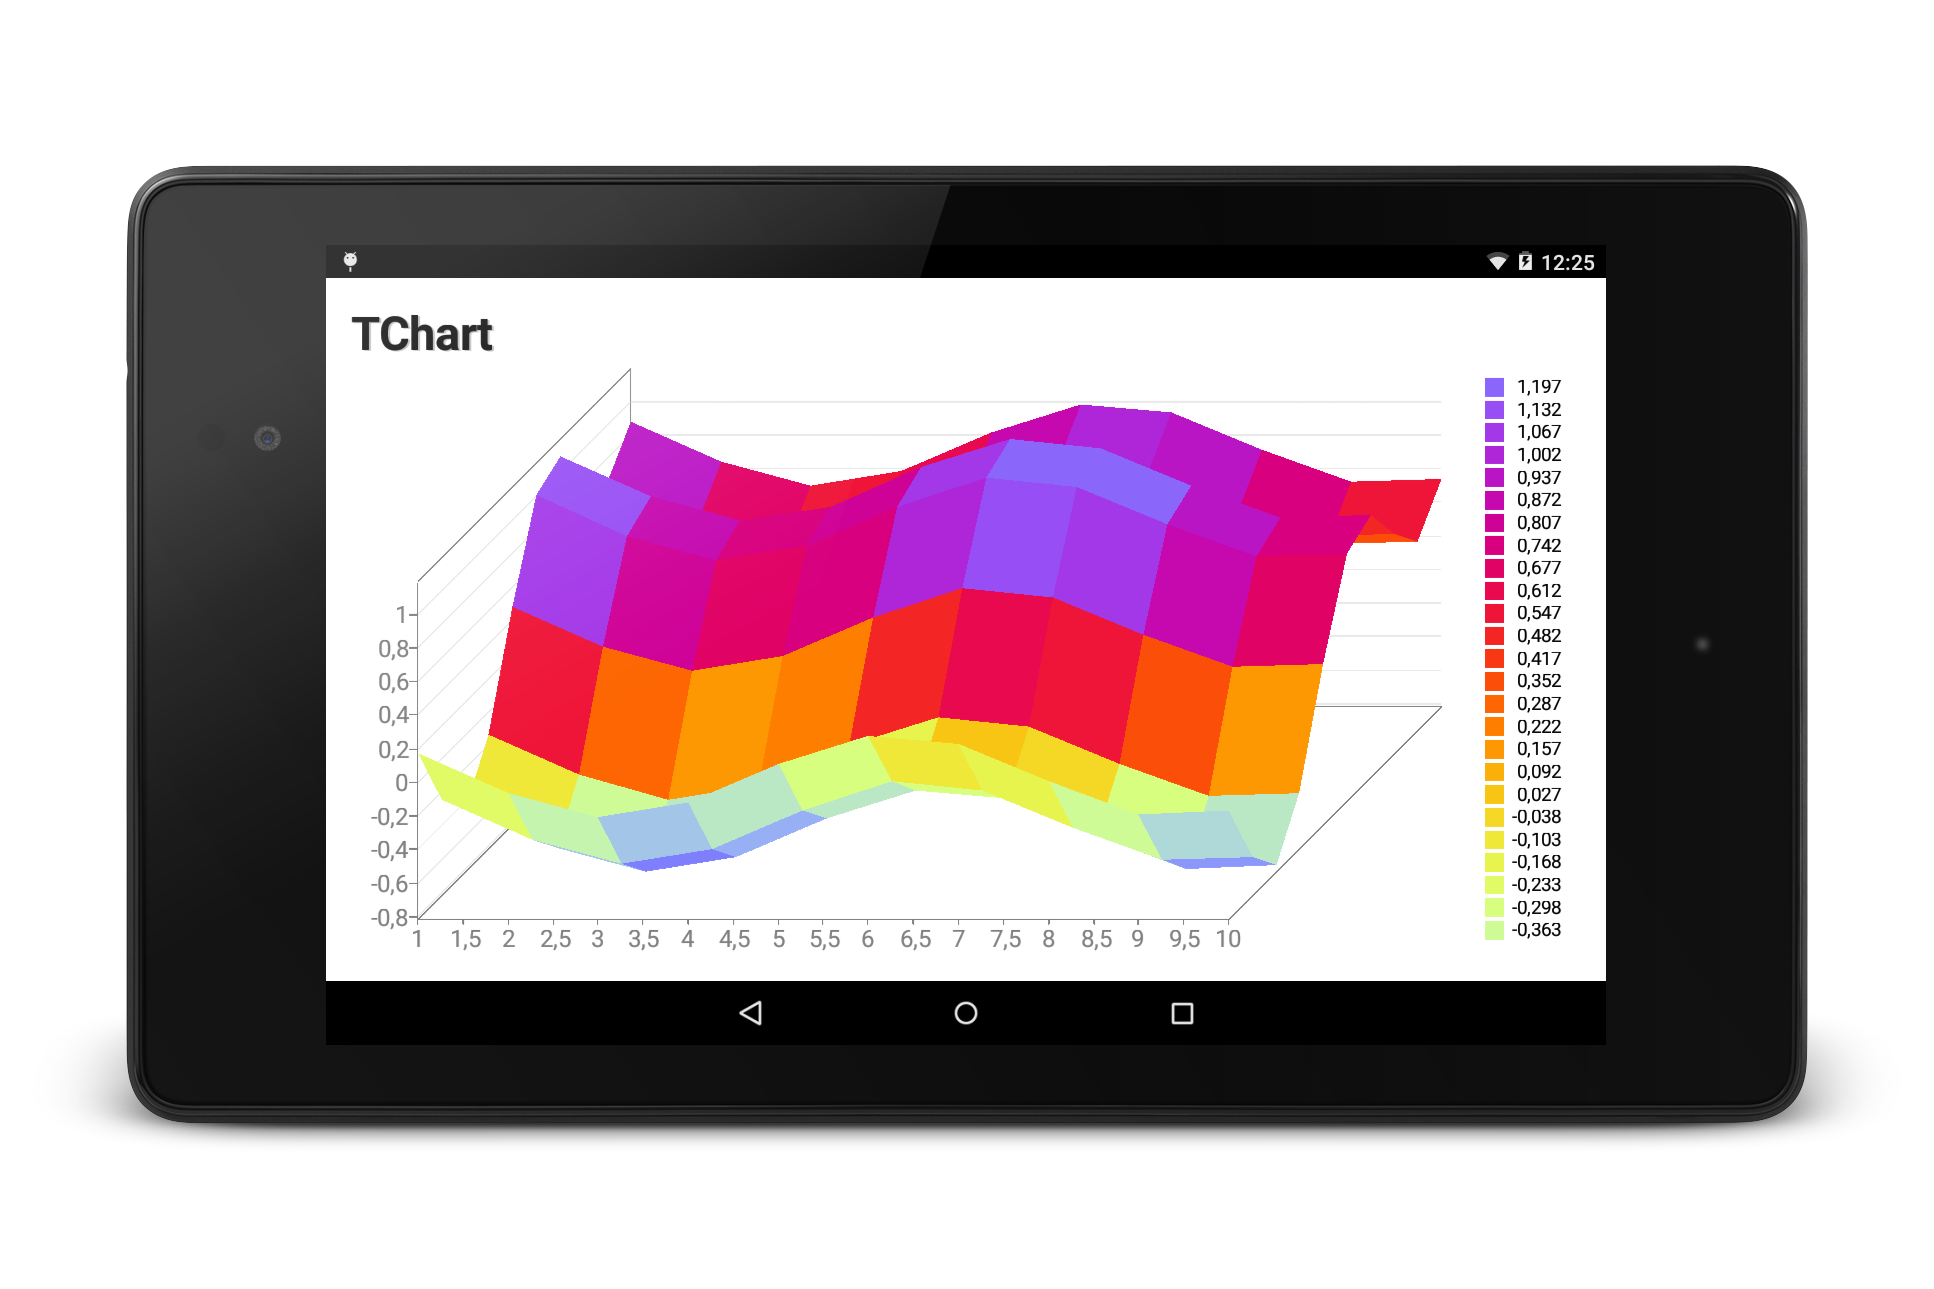
Series1 := TSurfaceSeries.Create(Self);
Series1.FillSampleValues(10);
Series1.UseColorRange := False;
Series1.UsePalette := True;
Series1.PaletteStyle := psStrong;
Chart1.AddSeries(Series1);
Chart1.Zoom.Allow := False;
Chart1.Panning.Active := False;
Chart1.Chart3DPercent := 50;
with TFlatTheme.Create(Chart1) do
try
Apply;
finally
Free;
end;
end;After that, it’s the turn of TChart‘s OnGesture event implementation:
procedure TForm1.Chart1Gesture(Sender: TObject;
  const EventInfo: TGestureEventInfo; var Handled: Boolean);
begin
  if EventInfo.GestureID = igiZoom then
    handleZoom(EventInfo)
  else if EventInfo.GestureID = igiPan then
    handlePan(EventInfo)
  else if EventInfo.GestureID = igiDoubleTap then
    handleDoubleTap(EventInfo);

  Handled := True;
end;
We are checking for TInteractiveGestures gestures performed on the chart, using event’s TGestureEventInfo, and implement a specific gesture handler method for each one. Finally, we set the Handled parameter to True so that the event is not propagated further.
Let’s speak about gesture handler methods now, starting with zoom:
procedure TForm1.handleZoom(EventInfo: TGestureEventInfo);
var
  LObj: IControl;
  chart: TChart;
  zoom: Double;
begin
  LObj := Self.ObjectAtPoint(ClientToScreen(EventInfo.Location));
  if LObj is TChart then
  begin
    if not(TInteractiveGestureFlag.gfBegin in EventInfo.Flags) then
    begin
      chart := TChart(LObj.GetObject);
      zoom := (EventInfo.Distance / FLastDIstance) * chart.Aspect.ZoomFloat;
      chart.Aspect.ZoomFloat := Max(10, zoom);
    end;
  end;
  FLastDIstance := EventInfo.Distance;
end;
Here we are implementing something different and simpler than the standard zoom in TeeChart. It’s based on the difference between the current distance and pinch that the gesture provides and the distance saved from previous calls, not allowing a zoom factor smaller than 10% of the original size.
Let’s continue with the pan gesture which, in this example, will be used for rotating the chart instead of panning it:
procedure TForm1.handlePan(eventInfo: TGestureEventInfo);
var
  LObj: IControl;
  chart: TChart;
begin
  LObj := Self.ObjectAtPoint(ClientToScreen(EventInfo.Location));
  if LObj is TChart then
  begin
    if not(TInteractiveGestureFlag.gfBegin in EventInfo.Flags) then
    begin
      chart := TChart(LObj.GetObject);

      chart.Aspect.Orthogonal := False;
      chart.Aspect.RotationFloat := chart.Aspect.RotationFloat + (EventInfo.Location.X - FLastPosition.X);
      chart.Aspect.ElevationFloat := chart.Aspect.ElevationFloat - (EventInfo.Location.Y - FLastPosition.Y);
    end;

    FLastPosition := EventInfo.Location;
  end;
end;
Similar to the pinch zoom gesture, here displacement (calculated from the screen position) is being used to rotate and elevate the chart.
Finally, the double tap gesture:
procedure TForm1.handleDoubleTap(eventInfo: TGestureEventInfo);
var
  LObj: IControl;
begin
  LObj := Self.ObjectAtPoint(ClientToScreen(EventInfo.Location));
  if LObj is TChart then
    ResetChart(TChart(LObj.GetObject));
end;

procedure TForm1.ResetChart(chart: TChart);
begin
  chart.Aspect.Orthogonal := True;
  chart.Aspect.ZoomFloat:=100;
  chart.Aspect.ElevationFloat:=345;
  chart.Aspect.RotationFloat:=345;
end;
It’s only used for resetting chart properties to their original values.
I hope this example is useful to illustrate the possibilities TeeChart has with multi-touch gesture on touch devices. It only covers a few cases but this opens up the possibility to a new world of charting interactions.
Here’s the complete code listing for the example discussed in this article:
unit Unit1;

interface

uses
  System.SysUtils, System.Types, System.UITypes, System.Classes, System.Variants,
  FMX.Types, FMX.Controls, FMX.Forms, FMX.Graphics, FMX.Dialogs,
  FMX.Controls.Presentation, FMX.StdCtrls, FMXTee.Engine, FMXTee.Procs,
  FMXTee.Chart, FMXTee.Series, FMXTee.Commander, FMX.Gestures,
  FMXTee.Series.Surface, FMXTee.Themes;

type
  TForm1 = class(TForm)
    Chart1: TChart;
    GestureManager1: TGestureManager;
    procedure FormCreate(Sender: TObject);
    procedure Chart1Gesture(Sender: TObject; const EventInfo: TGestureEventInfo;
      var Handled: Boolean);
  private
    { Private declarations }
    FLastPosition: TPointF;
    FLastDistance: Integer;
    procedure handleZoom(eventInfo: TGestureEventInfo);
    procedure handlePan(eventInfo: TGestureEventInfo);
    procedure handleDoubleTap(eventInfo: TGestureEventInfo);
    procedure ResetChart(chart: TChart);
  public
    { Public declarations }
  end;

var
  Form1: TForm1;

implementation

{$R *.fmx}

uses System.Math;

procedure TForm1.Chart1Gesture(Sender: TObject;
  const EventInfo: TGestureEventInfo; var Handled: Boolean);
begin
  if EventInfo.GestureID = igiZoom then
    handleZoom(EventInfo)
  else if EventInfo.GestureID = igiPan then
    handlePan(EventInfo)
  else if EventInfo.GestureID = igiDoubleTap then
    handleDoubleTap(EventInfo);

  Handled := True;
end;

procedure TForm1.FormCreate(Sender: TObject);
var
  Series1: TSurfaceSeries;
begin
  Series1 := TSurfaceSeries.Create(Self);
  Series1.FillSampleValues(10);
  Series1.UseColorRange := False;
  Series1.UsePalette := True;
  Series1.PaletteStyle := psStrong;

  Chart1.AddSeries(Series1);
  Chart1.Zoom.Allow := False;
  Chart1.Panning.Active := False;
  Chart1.Chart3DPercent := 50;

  with TFlatTheme.Create(Chart1) do
  try
    Apply;
  finally
    Free;
  end;
end;

procedure TForm1.handleDoubleTap(eventInfo: TGestureEventInfo);
var
  LObj: IControl;
begin
  LObj := Self.ObjectAtPoint(ClientToScreen(EventInfo.Location));
  if LObj is TChart then
    ResetChart(TChart(LObj.GetObject));
end;

procedure TForm1.handlePan(eventInfo: TGestureEventInfo);
var
  LObj: IControl;
  chart: TChart;
begin
  LObj := Self.ObjectAtPoint(ClientToScreen(EventInfo.Location));
  if LObj is TChart then
  begin
    if not(TInteractiveGestureFlag.gfBegin in EventInfo.Flags) then
    begin
      chart := TChart(LObj.GetObject);

      chart.Aspect.Orthogonal := False;
      chart.Aspect.RotationFloat := chart.Aspect.RotationFloat + (EventInfo.Location.X - FLastPosition.X);
      chart.Aspect.ElevationFloat := chart.Aspect.ElevationFloat - (EventInfo.Location.Y - FLastPosition.Y);
    end;

    FLastPosition := EventInfo.Location;
  end;
end;

procedure TForm1.handleZoom(EventInfo: TGestureEventInfo);
var
  LObj: IControl;
  chart: TChart;
  zoom: Double;
begin
  LObj := Self.ObjectAtPoint(ClientToScreen(EventInfo.Location));
  if LObj is TChart then
  begin
    if not(TInteractiveGestureFlag.gfBegin in EventInfo.Flags) then
    begin
      chart := TChart(LObj.GetObject);
      zoom := (EventInfo.Distance / FLastDIstance) * chart.Aspect.ZoomFloat;
      chart.Aspect.ZoomFloat := Max(10, zoom);
    end;
  end;
  FLastDIstance := EventInfo.Distance;
end;

procedure TForm1.ResetChart(chart: TChart);
begin
  chart.Aspect.Orthogonal := True;
  chart.Aspect.ZoomFloat:=100;
  chart.Aspect.ElevationFloat:=345;
  chart.Aspect.RotationFloat:=345;
end;

end.