Multi Touch with TeeChart for Xamarin.Android

Now that you know how to get started with TeeChart for Xamarin.Android, let’s get into a more interesting topic, multi-touch with TeeChart and Xamarin.Android.

From its inception, TeeChart for Xamarin.Android supports multi-touch gestures. However, since the release of build 4.14.6.25 in June 2014, the multi-touch offering has been extended with the implementation of the entire ZoomStyles.Classic functionality. In this article we will explain the different options presented to the programmer/user and what they can offer.

There are several ways to perform zooming and panning with TeeChart for Xamarin.Android. The door to the different possibilities is the TChart.Zoom.Style property. So we will elaborate on each specific value of Steema.TeeChart.ZoomStyles enum.

ZoomStyles.Classic

This is the most complete and versatile option available and the one which came the latest, as mentioned above. Choosing it the chart will zoom and scroll in a very similar way to the desktop version. However, instead of pressing a mouse button and drawing the zoom rectangle while dragging the mouse over the chart, it will respond to pinch gestures zooming the chart according to the virtual rectangle comprised between two finger pointers. This means dragging the fingers apart will zoom in the chart while closing them together will zoom the chart out. I must add this is automatically activated when two pointers are pressing the chart. If only one single pointer is pressing it panning will be activated instead. Actually, this is not 100% true, those options will be automatically activated only if the Allow property is also active (e.g.: TChart.Zoom.Allow and TChart.Panning.Allow). A little code snippet will help understanding this better:

tChart1.Zoom.Allow = true;
tChart1.Zoom.Direction = Steema.TeeChart.ZoomDirections.Both;
tChart1.Panning.Allow = Steema.TeeChart.ScrollModes.Horizontal;

The chart in the code above will be allowed to zoom in horizontal and vertical directions while will only allow scrolling in horizontal directions. Zoom has Allow and Direction self-explanatory properties, Panning does everything with one single property. To disable panning one should use Steema.TeeChart.ScrollModes.None. BTW, should ask to the TeeChart “fathers” about the reason behind this difference! writing this article has been useful to rethink this, deprecate Zoom.Allow property and add a new ZoomDirections.None enum value for Zoom.Direction property. Having that in mind, versions published after mid-July 2014 should use this code instead:

tChart1.Zoom.Direction = Steema.TeeChart.ZoomDirections.Both;
tChart1.Panning.Allow = Steema.TeeChart.ScrollModes.Horizontal;

Finally, double tapping on the screen will undo any scroll or zooming action.

So, in resume, this options includes exactly the same functionality as the desktop version and gives complete control to the user about which scaling or translation will the chart perform.

ZoomStyles.FullChart

The two following options are simpler and are based on image scaling and translation instead of drawing directly to the chart canvas as the previous option does. So, FullChart will also perform to pinch and drag gestures but scrolling or zooming the chart as an image in its entirety.

ZoomStyles.InChart

This adds some sophistication to the FullChart option. Internally it separates the chart in 4 areas: background, chart rectangle, left axis and bottom axis. This is because when zooming or scrolling, performing pinch or drag gestures, on the chart rectangle (the area comprised between the axes where the series are being painted), this area will be transformed as an image, as ZoomStyles.FullChart but, this time, axes will also be transformed as individual images to keep in synch with the chart rectangle. The chart background won’t be affected by those changes. So, all in all, this is some kind of hybrid version between ZoomStyles.Classic and ZoomStyles.FullChart.

ZoomStyles.None

This option won’t allow zooming nor scrolling the chart. This is only intended for real-time charting applications where performance is optimized and therefore, zooming and panning not allowed. It’s not only that some chart settings are modified to optimise performance but the way the chart is internally painted also changes. Threads running on the UI should be used to add data to the chart and refresh it for real-time smoothness. An example of this can be seen in the RealTimeCharting example included with both evaluation and registered versions.

Summary

In a nutshell, in this article we can see that TeeChart for Xamarin.Android supports a varied multi-touch offering to fit a wide range of requirements, giving many options to the programmer/user. It’s also worth mentioning all of this doesn’t forget touch events on the chart and series!


Getting started with TeeChart for Xamarin.Android

It’s been some time now since TeeChart for Xamarin.Android was released, in August 2012, following the path Xamarin started drawing about one year before. While Xamarin has made huge progress during this time, the corresponding TeeChart version has also evolved and improved correspondingly.

If you are reading this, you have probably already got started with Xamarin.Android. We will elude the Xamarin products details and focus on using TeeChart on them.

Xamarin Studio

After creating a new blank Android application, the easiest and fastest way is by using the TeeChart version in the Xamarin Component Store. Here’s a Xamarin guide on how to use it. Let’s apply that to TeeChart now. In an Android application, choose Project > Edit Components > Open Component Store (or Get More Components). This will load the component store for you:

ComponentStore

In the image above, you can see the TeeChart Charting Library as the 5th overall option. You can also find it in the Libraries category or find it with the given search option. Anyway, selecting the TeeChart Charting Library takes you to this screen:

TeeChartComponentStore

Besides the product info, getting started link, license, etc. there are two green buttons here. They will let you either evaluate the component or purchase it. A couple of things to comment on here. First, the evaluation version is fully functional and the only limitation you’ll experience with it is a watermark over the charts. Secondly, the evaluation and registered versions are also available at www.steema.com. Later on I will explain how to use the components outside the Component Store but now let’s continue with that. To do so I’ll choose the Try button option.

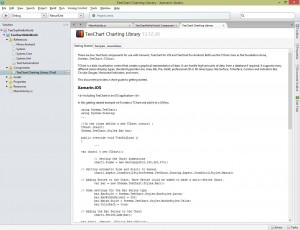
After agreeing to the licensing terms, this will add the TeeChart for Xamarin.Android trial version to your project, as an item in the Components folder and also as a TeeChart.Android.dll assembly reference in the References folder. The “references” part is all we will have to take care of to use TeeChart.Android.dll from outside the Component Store. The TeeChart entry in the Components list will also open the corresponding tab in Xamarin Studio’s main window:

TeeChartProjectComponents

The aforementioned TeeChart tab has 3 sub tabs: Getting Sarted, Samples and Assemblies. Actually, those names are self-explanatory. The first one contains some basic information and code snippets to get you started quickly on developing Android applications with TeeChart. The second one includes sample projects for iOS and Android. The third tab contains information about the assemblies included with the component and their version.

Prior to start to develop our own application, we will try with the Android example by pressing the corresponding button in the Samples tab. Doing so will add the MonoAndroidDemo project to our solution. The example project comes with a reference to the TeeChart.Android.dll we have chosen (trial or registered) and is ready to run on your emulator or device of choice.

Now, back to the Getting Started tab, there’s a little Android code snippet which we can copy and paste at the OnCreate method on our Activity:

protected override void OnCreate (Bundle bundle)
{
	base.OnCreate (bundle);

	Steema.TeeChart.TChart tChart1 = new Steema.TeeChart.TChart(this);        
	Steema.TeeChart.Styles.Bar bar1 = new Steema.TeeChart.Styles.Bar();       
	tChart1.Series.Add(bar1);        
	bar1.Add(3, "Pears", Color.Red);       
	bar1.Add(4, "Apples", Color.Blue);       
	bar1.Add(2, "Oranges", Color.Green);        
	Steema.TeeChart.Themes.BlackIsBackTheme theme = new Steema.TeeChart.Themes.BlackIsBackTheme(tChart1.Chart);       
	theme.Apply();        
	SetContentView(tChart1);
}

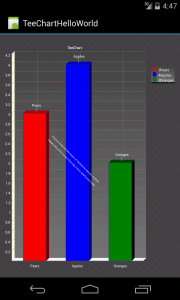
So now we have our first TeeChart for Xamarin.Android application ready to go.

GettingStartedSample

Let me explain what those lines of code exactly mean. We start creating a TChart object, the basic object of the component set, which is the chart container. A Bar series comes after, it’s created and added to the chart component. After that, some bars are added to the bar series: Y values, text labels and bar colors. Afterwards a chart theme is created and applied to the chart to change the overall aspect. Finally, the chart component is added to fill the parent view entirely. Getting a chart into your Android application is as simple as that.

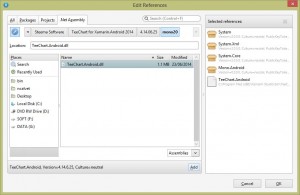
If are no not using the Xamarin Component Store because you are using a TeeChart.Android.dll downloaded directly from Steema it wouldn’t be that much different. You just have to manually browse for TeeChart.Android.dll in your hard drive at the References folder in your project: References > right mouse button -> Edit References > .Net Assembly. Here you’ll need to browse for the assembly in your disk and add it to the project.

ManualReference

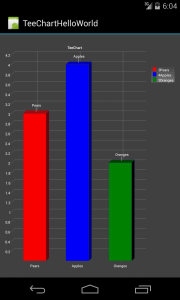
Changing from the trial version assembly from the Component Store to the registered version I have on my computer, I now get the same example without the evaluation watermark.

GettingStartedSampleRegistered

Visual Studio

There are no substantial differences on the basics of creating Android projects in Xamarin Studio and Visual Basic. As Xamarin explains in the Components Walkthrough article, Component Store is being used the same way in Visual Studio. A Components is added to each project. From there you can access the store with your Xamarin license credentials. Also, manually adding the assembly references to your project works very much the same way.

Summary

Now that you know how to use TeeChart in your C# Android applications, you are all good to start representing your data graphically in Android with C#. TeeChart for Xamarin.Android installers for Windows and Mac OSX, supplied by Steema Software, include some more demos, help files and a number of tutorials completing a wide range of TeeCharting aspects. Also, at the Steema Support forums for registered customers, you’ll find a huge number of questions with examples covering almost aspects of TeeChart. Non-registered users can post their technical inquiries at StackOverflow tagged with “TeeChart” and the platform/language.

If you are a native Java Android developer, Steema Software also has a native component for you, TeeChart Java for Android. Those targeting Android from Embarcadero IDEs, can use the TeeChart VCL/FMX version.