DashBoards and Data Visualization using Xamarin.Forms and TeeChart
This article is going to show how easy it is to create dashboard designs to show information, especially data, by using the layouts included in Xamarin.Forms and how to use the TeeChart charting library, which fully supports Xamarin.Forms.
In this example several Charts will be added to the layout, choosing a specific design which will be adjusted for each device depending on the platform chosen.
The first step is to create a new Xamarin.Forms application (Portable)
New Project -> Visual C# -> Mobile Apps -> Blank App (Xamarin.Forms.Portable)

Now, we’re going to add the TeeChart for Xamarin.Forms libraries as a reference to our projects to be able to use it.
Find the dlls for each specific platform on your hard disk (at the TeeChart for Xamarin.Forms installation folder). The TeeChart.PCL library also has to be referenced in all the projects.
Adding the TeeChart for Xamarin.Forms library as reference to the project.
TeeChart.PCL for the TeeChartDashBoards Portable project
TeeChart.PCL.Android.dll for the TeeChartDashBoards.Droid project
TeeChart.PCL.iOS.Unified.dll for the TeeChartDashBoards.iOS project
TeeChart.WP8.dll for the TeeChartDashBoards.WinPhone project
In order to make use of the TeeChart charting library we need to create a View which will contain the Chart component on it to be able to add it on our project, this “ChartView.cs” class has to be defined into the main project (all the platforms will make use of it).
To create, just add a new class to the TeeChartDashBoards Portable project and add the following code to it :
using System;
using System.Collections.Generic;
using System.Linq;
using System.Text;
using System.Threading.Tasks;
using Xamarin.Forms;

namespace TeeChartDashBoards
{
  public class ChartView: View
  {
    public ChartView()
    {
    }

    public EventHandler OnInvalidateDisplay;

    public static readonly BindableProperty ModelProperty = BindableProperty.Create("ModelProperty", typeof(Steema.TeeChart.Chart), typeof(ChartView), null);

    public Steema.TeeChart.Chart Model
    {
      get { return (Steema.TeeChart.Chart)GetValue(ModelProperty); }
      set { SetValue(ModelProperty, value); }
    }

    public void InvalidateDisplay()
    {
      if (OnInvalidateDisplay != null)
        OnInvalidateDisplay(this, null);
    }
  }
}
Now, in order to make use of the ChartView, a renderer class is needed for each specific platform, so we’ll create a new class named “ChartViewRenderer.cs” for each platform and add the following code :
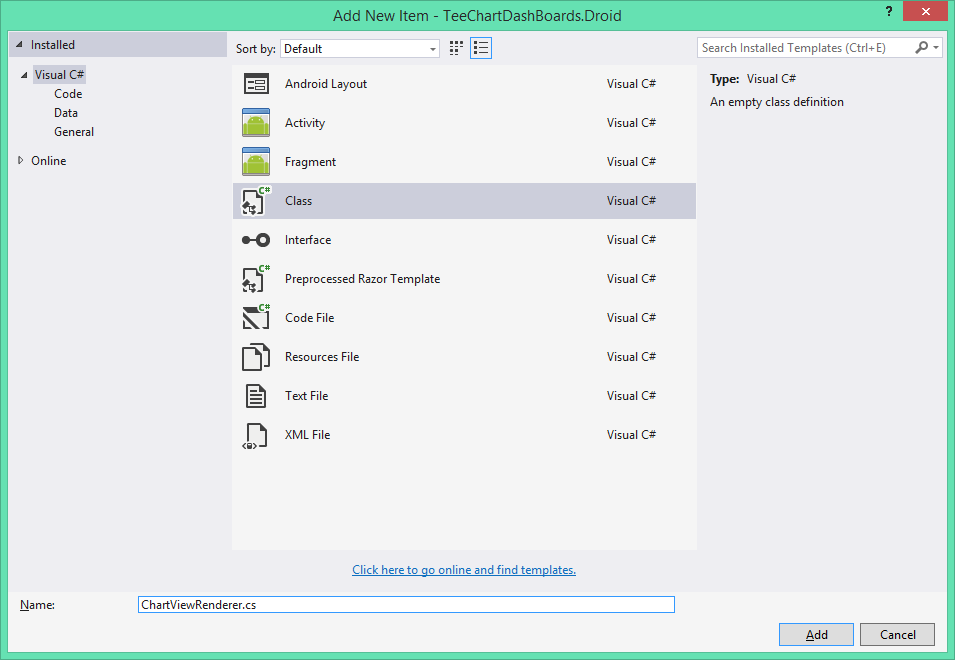
This is the code for the Android project :
using System;
using System.Collections.Generic;
using System.Linq;
using System.Text;
using Android.App;
using Android.Content;
using Android.OS;
using Android.Runtime;
using Android.Widget;
using Xamarin.Forms;
using Xamarin.Forms.Platform.Android;
using Steema.TeeChart;
using TeeChartDashBoards;
[assembly: ExportRenderer(typeof(ChartView), typeof(ChartViewRenderer))]
namespace TeeChartDashBoards.Droid
{
  public class ChartViewRenderer: ViewRenderer
  {
    protected TChart NativeControl
    {
      get
      {
        return ((TChart)Control);
      }
    }

    protected ChartView NativeElement
    {
      get
      {
        return ((ChartView)Element);
      }
    }

    protected override void OnElementChanged(ElementChangedEventArgs<View> e)
    {
      base.OnElementChanged(e);

      if (Control == null)
      {
        var chartView = new Steema.TeeChart.TChart(Context);

        chartView.Chart = NativeElement.Model;

        SetNativeControl(chartView);
      }

      if (e.OldElement != null)
      {
        //unhook old events
      }

      if (e.NewElement != null)
      {
        //hook old events
      }
    }
  }
}
Do the same for the iOS project, adding the following code :
using System;
using System.Collections.Generic;
using System.ComponentModel;
using System.Linq;
using System.Text;
using System.Threading.Tasks;
using Xamarin.Forms;
using Xamarin.Forms.Platform.iOS;
using TeeChartDashBoards;
[assembly: ExportRenderer(typeof(ChartView), typeof(TeeChartDashBoards.iOS.ChartViewRenderer))]
namespace TeeChartDashBoards.iOS
{
  public class ChartViewRenderer : ViewRenderer<ChartView, Steema.TeeChart.TChart>
  {
    protected override void OnElementChanged(ElementChangedEventArgs<ChartView> e)
    {
      base.OnElementChanged(e);
      if (e.OldElement != null || this.Element == null)
        return;

      var chartView = new Steema.TeeChart.TChart();

      chartView.Chart = Element.Model;

      SetNativeControl(chartView);
    }

    protected override void OnElementPropertyChanged(object sender, PropertyChangedEventArgs e)
    {
      base.OnElementPropertyChanged(sender, e);
    }
  }
}
and the for the WinPhone project :
using TeeChartDashBoards;
using System;
using System.Collections.Generic;
using System.ComponentModel;
using System.Linq;
using System.Text;
using System.Threading.Tasks;
using Xamarin.Forms;
using Xamarin.Forms.Platform.WinPhone;
[assembly: ExportRenderer(typeof(ChartView), typeof(TeeChartDashBoards.WP8.ChartViewRenderer))]
namespace TeeChartDashBoards.WinPhone
{
  public class ChartViewRenderer : ViewRenderer<ChartView, Steema.TeeChart.TChart>
  {
    protected override void OnElementChanged(ElementChangedEventArgs<ChartView> e)
    {
      base.OnElementChanged(e);
      if (e.OldElement != null || this.Element == null)
        return;

      var chartView = new Steema.TeeChart.TChart();

      chartView.Chart = Element.Model;
      chartView.Aspect.ClipPoints = false;
      chartView.Aspect.ExtendAxes = true;

      SetNativeControl(chartView);
    }

    protected override void OnElementPropertyChanged(object sender, PropertyChangedEventArgs e)
    {
      base.OnElementPropertyChanged(sender, e);
    }
  }
}
At this point, if we do “build solution” all should compile fine.
That being the case, it’s time to create a new Content Page in the main project, the initial page which will appear once the app is launched in one of the available platforms. Set “Home.cs” as the name for the page.
The solution should look like :

Inside this page, the first thing we’ll do is to remove all the code that has been generated by default and will add a code that creates a Navigation page which will allow us to navigate through all the Charts inside the dashboard :
public Home()
{
  NavigationPage.SetHasNavigationBar(this, false);
}
Now, we’ll define the layout, choosing the Grid layout that fits our needs. The grid layout allows one to specify the number of rows and columns to show and define the rowspan or colspan if needed (this will allow us to make the dashboard nicer) :
Grid grid = new Grid
{
  VerticalOptions = LayoutOptions.FillAndExpand,
  Padding = 5,
  RowDefinitions =
  {
    new RowDefinition { Height = new GridLength(1, GridUnitType.Star) },
    new RowDefinition { Height = new GridLength(1, GridUnitType.Star) },
    new RowDefinition { Height = new GridLength(1, GridUnitType.Star) }
  },
  ColumnDefinitions =
  {
    new ColumnDefinition { Width = new GridLength(1, GridUnitType.Star) },
    new ColumnDefinition { Width = new GridLength(1, GridUnitType.Star) },
    new ColumnDefinition { Width = new GridLength(1, GridUnitType.Star) }
  }
};

Content = grid;
Now it’s time to create the Charts that will be added on our dashboard. We’ll add seven Charts. First of all, we’ll create a “DashBoards” folder in the main project to add the content pages there, one for each chart. This folder has to be created one time in the main project (Portable).
Each page will define a specific chart with the Series used on it and its customised appearance. We’ll start with the content page named Page1.cs. We’ll use the following code:
using System;
using System.Collections.Generic;
using System.Linq;
using System.Reflection.Emit;
using System.Text;
using Steema.TeeChart;
using Xamarin.Forms;
namespace TeeChartDashBoards.DashBoards
{
public class Page1 : ContentPage
{
Chart dashBoard0;
public ChartView DashView0;
public Page1()
{
// NavigationPage.SetHasNavigationBar(this, false);
dashBoard0 = new Chart();
dashBoard0.Aspect.View3D = false;
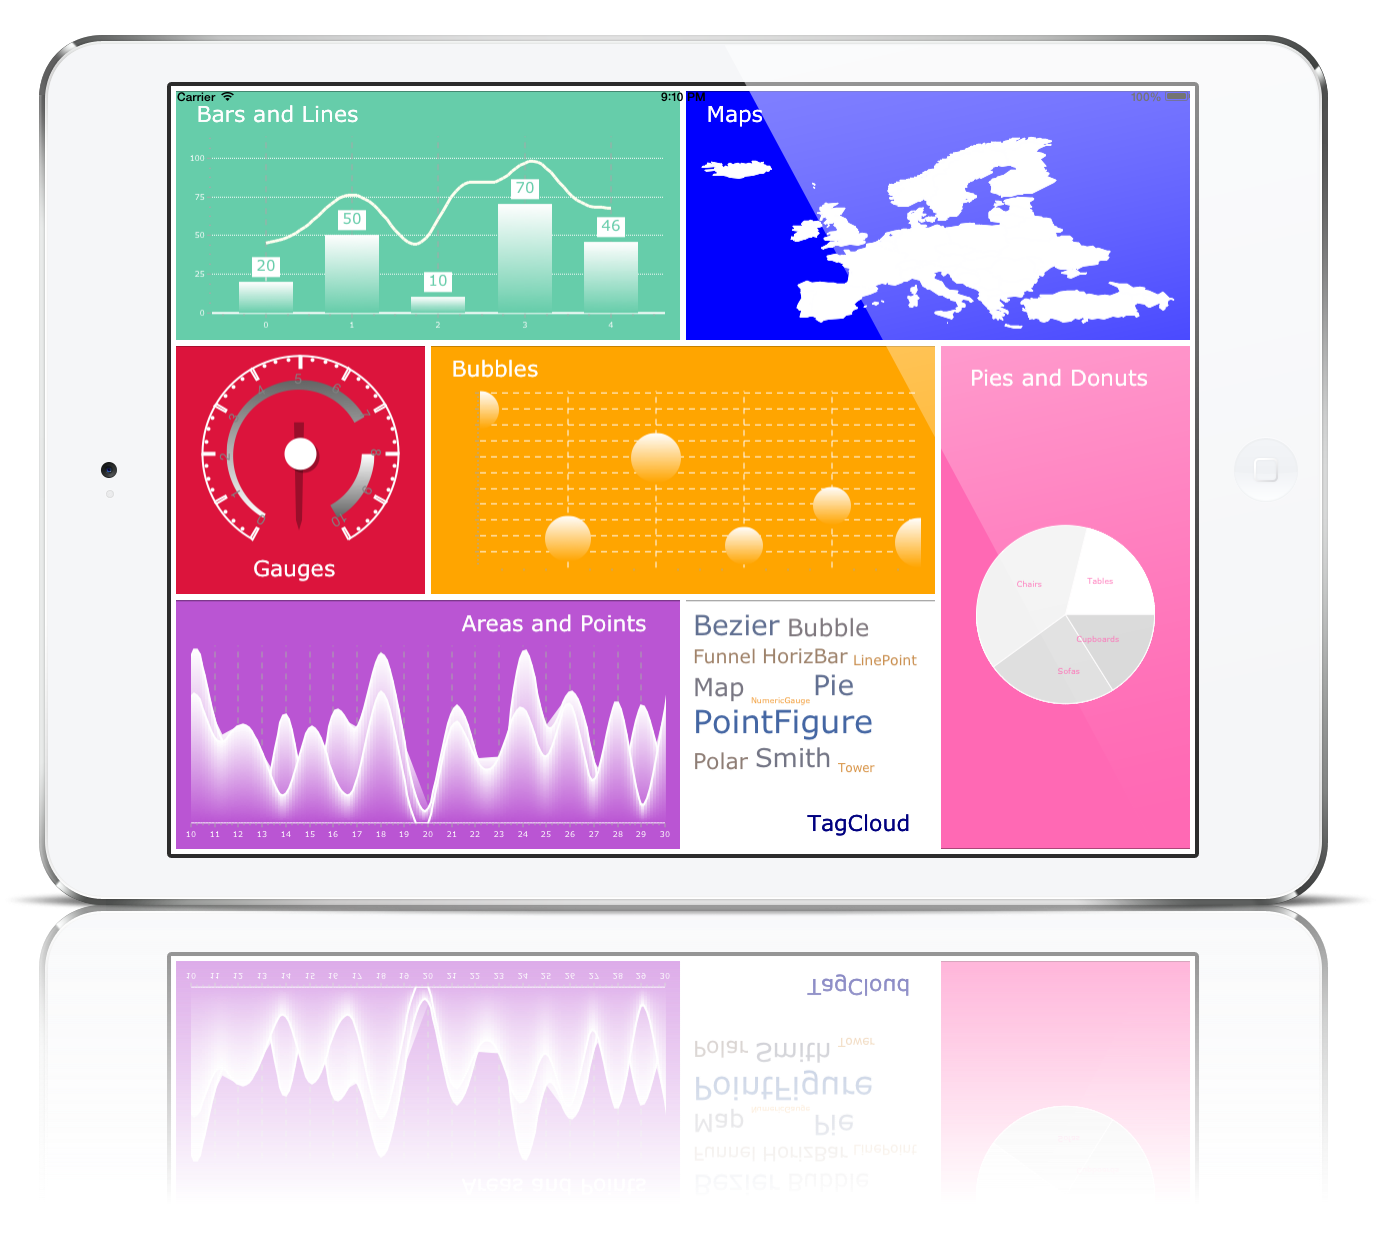
Steema.TeeChart.Styles.Bar bar1 = new Steema.TeeChart.Styles.Bar();
Steema.TeeChart.Styles.Line line1 = new Steema.TeeChart.Styles.Line();
dashBoard0.Series.Add(bar1);
dashBoard0.Series.Add(line1);
//barline chart
bar1.Clear();
bar1.Add(20);
bar1.Add(50);
bar1.Add(10);
bar1.Add(70);
bar1.Add(46);
bar1.Pen.Visible = false;
bar1.BarStyle = Steema.TeeChart.Styles.BarStyles.RectGradient;
bar1.Marks.Visible = false;
bar1.Gradient.StartColor = Color.White;
bar1.Gradient.EndColor = Color.FromRgb(102, 205, 170);
bar1.Marks.Visible = true;
bar1.Marks.Shadow.Visible = false;
bar1.Marks.Color = Color.White;
bar1.Marks.Font.Size = 15;
bar1.Marks.Font.Color = Color.FromRgb(102, 205, 170);
bar1.Marks.Pen.Visible = false;
bar1.Marks.ArrowLength = 5;
bar1.Color = Color.White;
line1.Clear();
line1.Add(0, 45);
line1.Add(0.444444444444444, 55);
line1.Add(0.888888888888889, 75);
line1.Add(1.33333333333333, 65);
line1.Add(1.77777777777778, 45);
line1.Add(2.22222222222222, 80);
line1.Add(2.66666666666667, 85);
line1.Add(3.11111111111111, 98);
line1.Add(3.55555555555556, 75);
line1.Add(4, 68);
line1.Color = Color.FromRgb(255, 255, 240);
line1.LinePen.Width = 3;
line1.Smoothed = true;
dashBoard0.Panel.Color = Color.FromRgb(102, 205, 170);
dashBoard0.Panel.Gradient.Visible = false;
dashBoard0.Walls.Back.Visible = false;
dashBoard0.Title.Text = "Bars and Lines";
dashBoard0.Title.Alignment = TextAlignment.Start;
dashBoard0.Title.Font.Size = 22;
dashBoard0.Title.Font.Color = Color.White;
//dashBoard0.Title.Font.Name = "";
dashBoard0.Axes.Left.AxisPen.Visible = false;
dashBoard0.Axes.Bottom.AxisPen.Color = Color.White;
dashBoard0.Legend.Visible = false;
dashBoard0.Axes.Left.Grid.Color = Color.White;
dashBoard0.Axes.Left.Grid.Style = Steema.TeeChart.Drawing.DashStyle.Dot;
dashBoard0.Axes.Left.Labels.Font.Color = Color.White;
dashBoard0.Axes.Bottom.Labels.Font.Color = Color.White;
dashBoard0.Axes.Left.Increment = 25;
DashView0 = new ChartView
{
VerticalOptions = LayoutOptions.FillAndExpand,
HorizontalOptions = LayoutOptions.FillAndExpand,
};
DashView0.Model = dashBoard0;
Content = new StackLayout
{
Children = {
DashView0
}
};
}
}
}The code above defines a Chart component for the page, adds some series styles to it and then set some custom aspects. I’m not going to add all the seven code pages here, as the same code structure has to be used, just that we can use other Series types and change the aspect settings as preferred. You will find the ones I have chosen by downloading the complete example at the bottom of the page. In order to follow this article do the same for other pages (Page2.cs, Page3.cs,…) as you have done for the first page.
Now that we have all the Chart styles (pages) we want to appear in our dashboard we’ll go back to the home page to add the necessary code to call each one of the pages and add it to the dashboard.
From here we call each one of the pages generated to be added to each of the cells of the grid; in this way we avoid having to recreate the charts.
First we create the seven DashBoard Charts, just before assigning the content to the grid:
// Create the Chart pages whose contain a specific Chart on each one
DashBoards.Page1 dashchart0 = new DashBoards.Page1();
DashBoards.Page2 dashchart1 = new DashBoards.Page2();
DashBoards.Page3 dashchart2 = new DashBoards.Page3();
DashBoards.Page4 dashchart3 = new DashBoards.Page4();
DashBoards.Page5 dashchart4 = new DashBoards.Page5();
DashBoards.Page6 dashchart5 = new DashBoards.Page6();
DashBoards.Page7 dashchart6 = new DashBoards.Page7();
To be able to navigate between each Content Page (available Chart pages) I’ve decided to create a button and add it to each cell. Some other ways might also work in order to execute part of code once cell is tapped, but this one allows one to do it easily, and also this way, lets us take advantage of the button class functionalities.
We need to create a button for each dashChart. Here’s the code for one of them :
Button button0 = new Button()
{
  VerticalOptions = LayoutOptions.FillAndExpand,
  HorizontalOptions = LayoutOptions.FillAndExpand,
  Command = new Command(() => Navigation.PushAsync(new DashBoards.Page1()))
};
And now we’ll add all the Charts and buttons created to the Grid layout. I’ve chosen some specific rowspan and colspan for some cells, just to look better, but anyone can customise it their way:
// Grid
grid.Children.Add(dashchart0.DashView0, 0,2,0,1);
grid.Children.Add(button0,0,2,0,1);
grid.Children.Add(dashchart1.DashView1, 2,4,0,1);
grid.Children.Add(button1,2,4,0,1);
grid.Children.Add(dashchart2.DashView2, 0, 1);
grid.Children.Add(button2,0, 1);
grid.Children.Add(dashchart3.DashView3, 1, 3, 1, 2);
grid.Children.Add(button3, 1,3,1,2);
grid.Children.Add(dashchart4.DashView4, 3,4,1,3);
grid.Children.Add(button4, 3, 4, 1, 3);
grid.Children.Add(dashchart5.DashView5, 0, 2, 2, 3);
grid.Children.Add(button5, 0, 2, 2, 3);
grid.Children.Add(dashchart6.DashView6, 2, 2);
grid.Children.Add(button6, 2, 2);
The last steps are to modify the App.cs class. This one needs to call the Home.cs content page :
public App()
{
// The root page of your application
  MainPage = new NavigationPage(new Home());
}
We’ve also to modify the MainPage.xaml.cs page in order for it to work fine on WinPhone :
public MainPage()
{
  InitializeComponent();

  Forms.Init();
  Content = new TeeChartDashBoards.Home().ConvertPageToUIElement(this);
}
Now we’re going to try to do a build for all the projects, run the app on each platform (IOS, Android y WinPhone) and see the results.
The source code of this example can be downloaded from the Steema GitHub page.
The result should look like: